How to Make Free-Printables in Publisher {Papers}
Free-Printables are huge on the blog circuit nowadays. Readers love them because they make crafting ever so simple. What would you say if I told you that most people already have the tools to make great printables on their own computer? Well, you most likely do. If you have a PC, and have Microsoft Office, you probably also have Microsoft Publisher. I do all my free-printables in Publisher, and I do a ton of them. Now, you can too. If you are an Apple person, I am not going to be able to help you. Sorry!
Over the next few weeks, I will be bringing you tutorials about designing your own printables. Sure, Photoshop gives you more options, but you don't really need them. You might be somewhat limited with using Publisher, but not nearly as much as you might think. Let me first start off by saying that "free-printables" should be totally created by you in order for you to give them away for free. There are some exceptions to this, but lets roll with that for now. I will go a little more into depth about this when we get into using other cliparts. But basically, unless the original designer gives you permission to use their digital papers or cliparts you cannot use them. Even though you are not selling these designs, the designer doesn't want you just giving away their designs to others who haven't paid for them. So, using a digital paper purchased elsewhere for your freebies is a no-no. This is why knowing how to create your own digital papers is so important. Today's tutorial is how to make your own digital paper with diagonal stripes. Diagonals are super easy and very flattering. Today I am going to teach you how to make this orange and white diagonal paper.
First open your Publisher program and select Blank Print Publication. The default page size should be 8.5 by 11 already, so you shouldn't have to worry about changing anything. For future reference, know that you can always change your page size or orientation by clicking on File, Page Setup, Custom and then typing in your dimensions.
Once your document is opened, click on Insert, Autoshapes, Basic Shapes, and Rectangle.
Use your mouse to stretch the rectangle to fit the entire page.
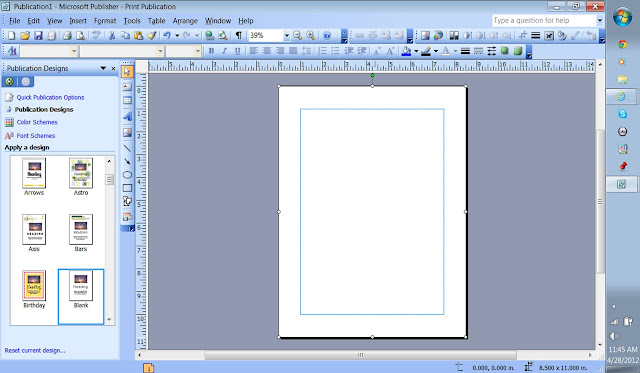
While the rectangle is selected, double click on it. A window should open up that looks like this.
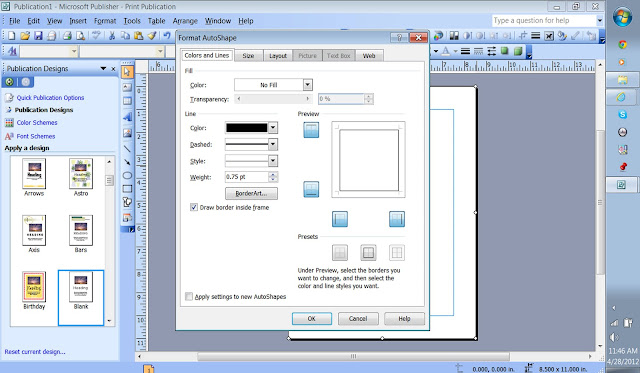
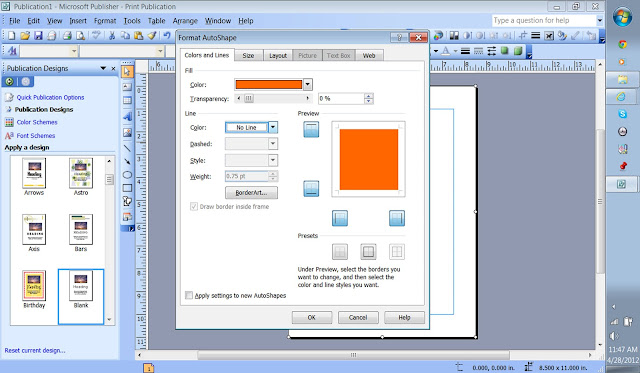
Under the Fill category, click on the arrow next to Color and some colors should pop up. Select the one that you want. You are not limited to just the ones that pop up. You can also select from the standard and custom options. For now, I just chose orange. I also changed the Color of the Line to No Line, so that the rectangle didn't have a border.
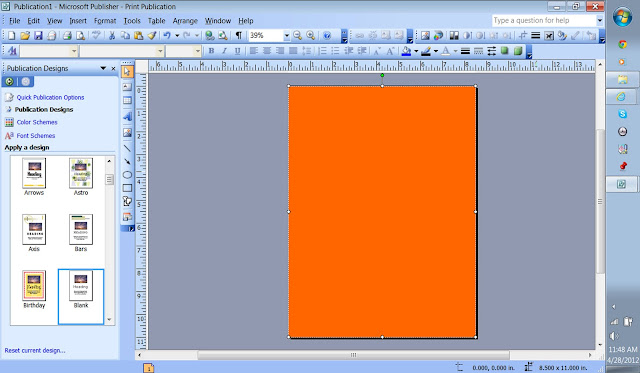
Your page should now look something like this.
Next click on Insert, Autoshapes, Lines, and Line.
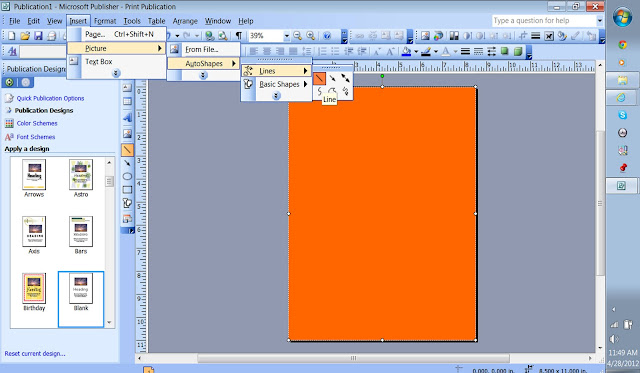
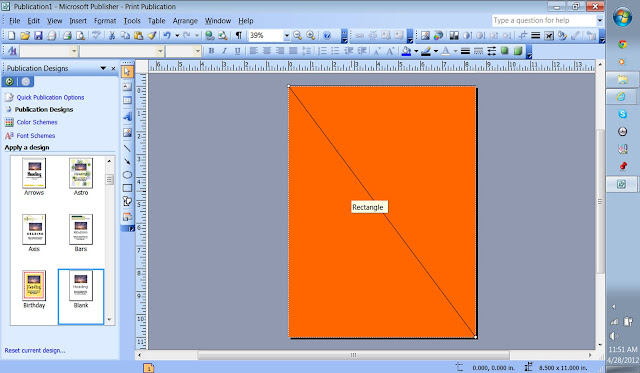
Take your mouse and stretch your line to fit the span of the paper as a diagonal.
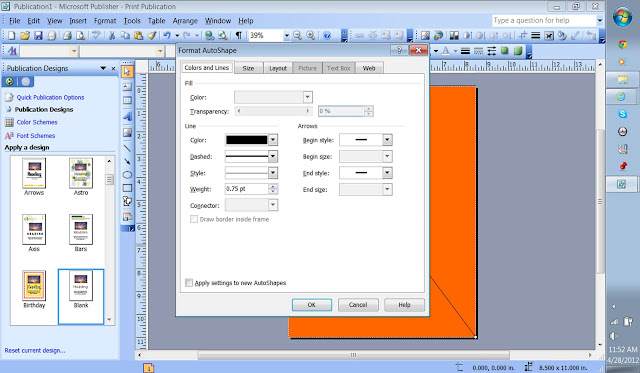
To change the color of the line, select it and double click it. A window will pop up again. Since it is a line, no values should be available for the Fill category. Select the arrow next to Color in the Line category.
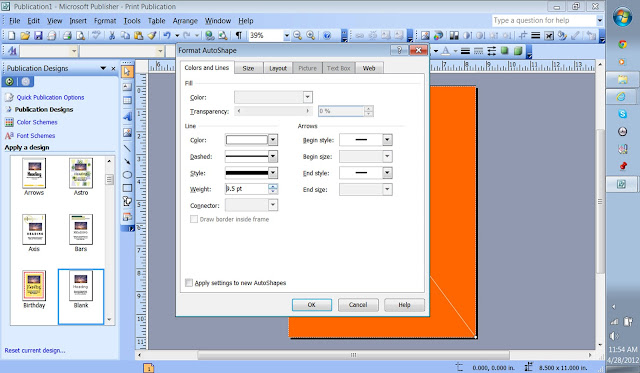
Select the Color you want. I chose white for mine. You can also change the Weight of your line here. I made mine 9.5 pt.
In order to make the rest of my lines I just copy and paste it at intervals. If you don't see it paste, it is probably pasting the line directly on top of the other. If this happens, just move it. You don't have to worry about the lines running off the page. Just make sure that they cover the area that is orange. Since your document is sized 8.5 by 11, the image will cut of anything outside of those dimensions.
Once you have your paper the way you want it, you will need to save it. Go to File and Save As. Type your file name and then Save As a JPEG. This is found under the File Name option. Just click the arrow and scroll down until you find it. Once you have selected that, it will give you some options for Resolution. Select Commercial Printing (300 dpi). This will insure the best quality printout.
Once you have saved it, open the file up as a picture to view it. It should look something like this.
If you want to change up your diagonals, here are some other ideas to try. Select different lines and play around with the Color, Dashed, Style, and Weight categories.
Here are some of the changes I made with mine. Also, make sure to save the document as a Publisher document as well. This way you can make multiple papers for one document by changing the colors. Just save the JPEG as a different name each time.
I hope you have benefited from this tutorial and it wasn't too confusing. I will try to bring at least one new tutorial per week related to this subject. I would love to hear your feedback about things you would like me to cover. If people don't seem interested, I won't continue to do them.
Linking this project to:

.jpg)


Love this thanks so much!!! Would love to offer free printables from time to time to my bakery customers!
ReplyDeleteYay! Hope my tutorials help!
DeleteLoved this! Thanks! :)
ReplyDeleteWhat a helpful post! Thank you so much for taking the time to do this and share it!
ReplyDeleteThis is great...now I have to figure out why I don't seem to have Publisher on my computer. Do you save your printables online somewhere like google docs or do you make pdf versions when you add them to your site for others to download?
ReplyDeleteI just save them as JPEG images and upload them to my box.com account. It's free. Hope that helps!
DeleteHi Natalie! Thanks for posting these great instructions! I had never thought about making my own backgrounds for printables. I am going to "pin" this so I can have it for future reference. I saw your post over at "Tatertots and Jello".
ReplyDeleteHope they help!
DeleteThank you so much for this awesome tutorial! I have been stressing about finding a new way to make printables since picnik closed.
ReplyDeleteGlad I could help! PicMonkey.com is also a lot like Picnik was. I am not sure if you have tried that site yet.
DeleteI am trying to create a multi-colored chevron design on Microsoft Word or Publisher... PLEASE HELP!!!!
ReplyDeleteI am happy to help. First off, you will need a cheveron. You will not be able to make a true cheveron in Publisher. I can send you a cheveron I made if you need one.
DeleteHi! I just found this great tutorial! I've used publisher for a long time, but never thought about some of the things you showed. I'm attempting to design my own planner for my first year of teaching and will be using some of these ideas for dividers, but I'm a sucker for chevron. I've spent a lot of time attempting to make my own, but can't get it right. I'd just use one off the interwebs, but I want it to match my color scheme. Are you still willing to send that out to a random person?
DeleteJust emailed you!
DeleteI have designed some things in Publisher but whenever I have them printed at the store, the words always look pixelated. Do you know how to make it print as nicely as I am viewing it in Publisher?
ReplyDeleteAre you saving at 300 dpi?
DeleteJust saw this pinned on Pinterest and I recommend saving anything you create as a PNG file instead of JPEG. Pixel loss is practically nonexistent!
ReplyDeleteLove it, I learned a lot! Any more ideas?
ReplyDeleteHi there! I just stumbled across this blog....I am so excited to try the tips you provided..thank you!! Are you still willing to email the chevron printable so I can make it coordinate with the colors I am working with? Please and thank you! My email is Krysta.thirtyone@gmail.com
ReplyDeleteI will try to send these tonight when I get home.
DeleteI'm trying to make some signs for my wedding and chevron is killing me! Any chance you would email me your printable as well? My email address is carla.nearing@gmail.com Please, Thank you and God Bless! :)
ReplyDeleteJust emailed you.
DeleteCan you please send me the Chevron printable? I have been working on one for a few hours and I just can't seem to get it right. Thanks! Oh, my email is angelarlally@hotmail.com :)
ReplyDeleteHi there
ReplyDeleteThis is great! quick question, I can't get the whole color to print..leaves an edge at the bottom. Any help would be appreciated :)
Heather
Please make sure your document is the correct size as the paper you are printing on.
DeleteCan you please send the chevron to me too--christi1991@gmail.com? Thank you! This is so helpful!
ReplyDeleteI would also like the chevron if possible:) smbruce1979@gmail.com
ReplyDeleteCan I please have the chevron template also? Pretty please? ayelet613 at gmail
ReplyDelete