Travel Countdown First/Then Board
I recently shared this over at Tatertots and Jello. It's a super-cute travel countdown!
Road trips can be such a stressful experience when it comes to traveling with kiddos. My Kiddo always has such a hard time with the prolonged periods of sitting, so I wanted to come up with a little something to keep her busy during the long drive. Since I do not feel that I am unique in this predicament, I thought it best to share this idea with others. I utilized a concept that I use frequently as a developmental therapist. It's called a First/Then Board. For those not familiar with First/Then boards, it's basically a visual way to help children understand a sequence of events. Under usual circumstances, I would never put so many "firsts" before the "then", but I made an exception for this little travel board. Basically, the idea is that you show the child what has to occur "first" (usually something undesired) and then show them the "then" which is usually a rewarding and desirable activity. So for ours, I made the "first" 12 treats, and the "then" the beach. We were actually going to a wedding, but The Kiddo has no way of understanding what that means. I just said we were going to the beach, since she would be seeing it for the first time.
When it comes to actually using your board, you can choose to use words or pictures. Since My Kiddo is so young, I found pictures to be the most effective. Whatever you choose to use, just make sure your child has a good understanding of what it means.
Here is what the board for My Kiddo looked like. I took a picture of the empty board for the treats part and a just googled a picture of the ocean for the beach part. 

You can also choose to use words like this one. Whatever you use, make sure you familiarize your child with the concept before the trip. It doesn't take long for the child to understand, but you don't want your child's first time seeing this to be on the trip.
Just a few more tips before I tell you how to make your own:
After using the board during our trip, I found that this becomes more of a busy board for children 18 months and younger. For children two and older, it can be a valuable tool to help children have a tangible representation of the passing of time. Often when children ask us how long, we say something like, "Two more hours". But what is an hour to them? If you tell them in two treats and reward them in one hour increments, kid's are much more likely to understand. Use whatever increments of time you wish. If you are going to use hours, just make sure you figure in all your stops into your time.
Because a sleeping child would be most ideal for a road trip, I have made some sleep cards. Just reward them with one in each pocket of time they sleep through. Not only do they get to open all of those treats when they awaken, they can trade those cards in for something special of their choice when you reach your destination.
Now here is how to make it:
You can buy a backseat travel organizer or you can just adapt an over-the-door shoe organizer. I purchased this shoe organizer for under 10 dollars.
I used some wide ribbon for my hanging straps.
I cut three evenly-sized pieces of ribbon for the bows that would secure the strap.
I inserted the three ribbons...
and then layed the strap piece across it. Make sure to cut your strap ribbon plenty long, so that it can tie in a bow and hang from the back of your carseat.
Next, I just tied the three bows to keep the hanging strap in place.
For the pieces on the corner, I just tacked them down with some hot glue on the front...
and a little on the back.
As for the bottom of my shoe organizer, I chose to cut off the remainder. My car seats were only tall enough to allow for 2 rows. At first, I just taped up the remainder onto the back, but it didn't hold very well.
I then fixed up the edge a bit by adding a little zigzag stitch with matching thread.
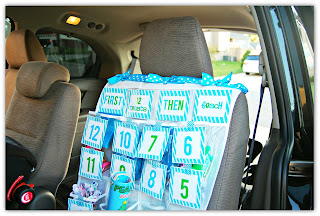
Once the organizer is completed, just attach all of your elements. I attached the header with velcro and the rest with some coordinating washi tape on the outside. I had to double up the numbers on mine since I only had twelve spaces to work with. You can easily put the numbers on the inside or attached to some cardstock. I just put them on the outside because I didn't want them to get squished. Here is what mine looked like. I used the word cards instead of the picture cards in order to snap a better picture of it.
Here are some of the things I wrapped up in mine. Nothing new, just some of My Kiddo's toys and some snacks. Unwrapping toys takes up time and provides a great workout for those tiny hand muscles. Just be sure to bring a trash bag.
I attached it to the front of the carseat, since my Kiddo is still rear-facing.
This won't solve all of your "Are We There Yet?" moments, but it will certainly help. Hopefully, I didn't make anyone too crazy over all the details. But that is what I'm known for! Here are the links to those printables for subscribers to this blog:


Comments
Post a Comment
PLEASE NOTE: In an effort to spend more time with my family, I am NO LONGER taking any special requests for designs. You are welcome to use the free-printables that I have already provided via download links. God Bless!